


May 30, 2025
Description
Printing assembly instructions below!
The HMS Hood, the first of the Admiral-class battlecruisers built in 1916 for the Emergency War Programme. Since then it has been a feared battleship and a proud jewel in the Royal Navy. Sunk by the Bismarck (of which I also have a model you can find here, fun to have both boats side by side ;).) its success ended in the second World War.
Just so you're aware of what you are getting yourself into, this is a pretty large project. It will cost quite a bit of filament (less than a spool, but at least half of it) and your printer will be busy for hours and hours on end. You can see the details in the dedicated details page just above here.
Model scale: 1:385.
PRINT INSTRUCTIONS
You can print the files any way you want, but I do have some simple recommendations.
Hull parts
Speed: 0.20mm Quality
Infill: 20%
Fill pattern: Adaptive Cubic
Support: Organic
Small parts
Speed: 0.05mm Ultradetail
Infill: 20% - 100%
Fill pattern: Cubic
Supports: Organic
ASSEMBLY AND PAINTING INSTRUCTIONS
Before assembly, make sure you have all of the parts listed below!
| Part name | Amount needed |
|---|---|
| Hull part 1 | 1 |
| Hull part 2 | 1 |
| Hull part 3 | 1 |
| Hull part 4 | 1 |
| Hull part 5 | 1 |
| Hull part 6 | 1 |
| Hull part 7 | 1 |
| Hull part 8 | 1 |
| Hull part 9 | 1 |
| Hull part 10 | 1 |
| Hull part 11 | 1 |
| Hull part 12 | 1 |
| Hull part 13 | 1 |
| Hull part 14 | 1 |
| Hull part 15 | 1 |
| Twin 15 inch gun with 20-barrel Unrotated Projectile mount | 1 |
| Twin 15 inch gun | 3 |
| Octuple 2 pdr (40 mm) AA gun | 3 |
| 20-barrel Unrotated Projectile mount | 4 |
| Twin 4 inch AA gun | 7 |
| Decked carrier | 3 |
| Cloth-covered carrier | 3 |
| Big carrier | 1 |
| Double stacked carriers big | 1 |
| Double stacked carriers small | 1 |
| Double stacked lifefloat | 5 |
| Single lifefloat | 7 |
| Stationary lifeboat seated | 2 |
| Stationary lifeboat unseated | 2 |
| Carrier crane | 1 |
| Grill left | 1 |
| Grill right | 1 |
| Floodlight | 6 |
| Back tower | 1 |
| Lookout type 1 | 2 |
| Lookout type 2 | 1 |
| Scanner | 2 |
| Big connection pins | 42 |
| Small connection pin | 1 |
Step 1.
Assemble the hull. This is done by connecting all the different hull parts with the 43 pins (42 big connection pins and 1 small pin), and glueing the hull parts together. NOTE: The pins are not made to hold the ship together, they are only there to keep the hull parts aligned when you are glueing the parts together!
NOTE 2: Do not yet put the smaller prints like the cannons on the hull parts in this step! Painting the ship is a lot easier without the small pieces already on top.
The diagram below might help in showing how to connect the hull parts together. Note that this diagram is with the hull pieces from the Bismarck model, not the Hood model. The steps still work the same though as the ship is designed in the same way.
Once all 15 hull parts are glued together you can move on to the next step.
Step 2.
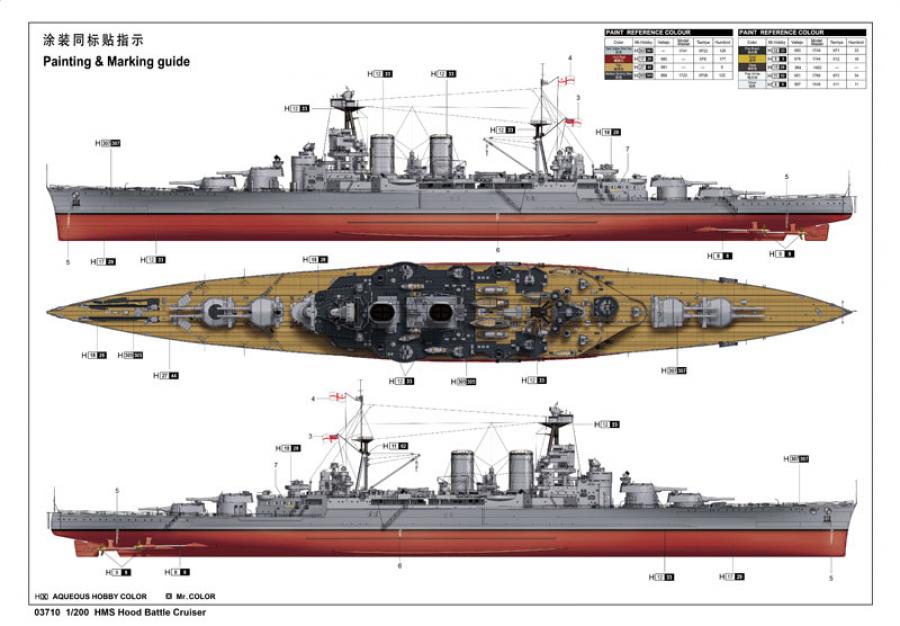
Now it is time to paint her up. I used the paint scheme in the link below, but you are free to paint her any way you want if you even want to do so (painting will take a while, but I'm telling you it is absolutely worth it!)
You can find the paint scheme I used here:
https://www.hobbylinna.fi/pictures/thumbs900/6215e310616c1.jpg
Step 3.
Now it's time to add the tiny parts to the glued and painted hull parts. To view a diagram of what parts go where on the ship, head to ‘files’, scroll all the way down and download ‘Where goes what guide.pdf’.
License:
Creative Commons — Attribution — Noncommercial
 KLM1318


 Full Scale Helmet (Rogue One) preview image")


